Monthly Archives: February 2008

You’re a Super-Star!

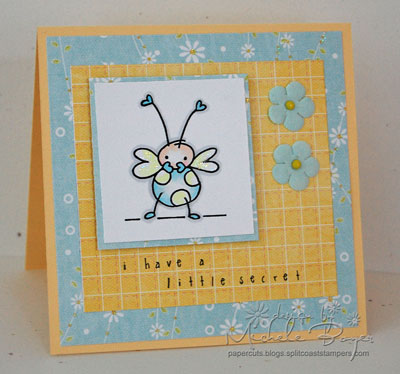
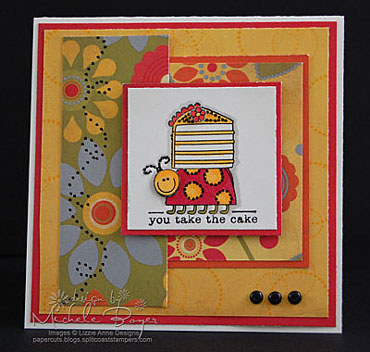
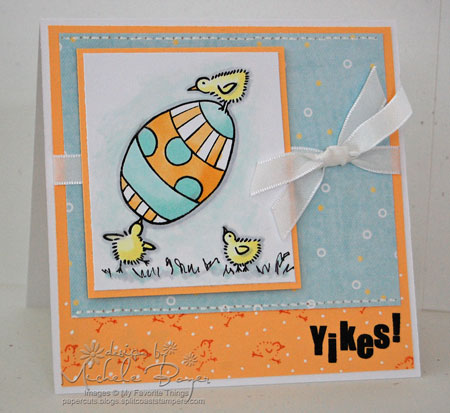
Good morning!  Today I’ve used AmyR’s Friday sketch challenge and one of my favorite stamps by C.C. Designs, the Play Ball Bitzy Bug!  (I actually love all the Bugz!)

SSBB

I stamped the image onto Bazzill Coconut Smoothies cardstock with the intention of using Copics to color the image.  But apparently, 144 Copics just aren’t enough.  I couldn’t seem to match ANY of the colors on this patterned paper!  So instead I used SU reinkers and I have to say I LOVE how the Bazzill Smoothies accepts watercolor!  I’ll be using my ink more often now.  The colors didn’t bleed, the paper didn’t warp…I was very happy.  (I did, however, use a gray Copic to outline the image once the ink was dry.)

I also “tried” to use my new Copic airbrush for the first time.  ACK!  I either need an air compressor or a REALLY big can of air because I need LOTS of practice.

I also tried (many times) to use my little Daisy D’s baseball stitch roll-on rub-on.  Let’s just say it didn’t work very well and it is now in the trash.  So I used my mat pack to make my own baseball stitch (across the yellow stripe).  Once I pierced the straight line, I readjusted the template so that the straight line of holes fell in between two rows of template holes.  That way the “stitches” were closer together.  I also used the mat pack to faux stitch around the oval. If  you insert the needle through one hole, leave the needle in the cardstock and turn the template, you can align the next hole along the curve and still have evenly spaced “stitches.”

Be sure to check out the All That Scraps blog!  There’s a contest you might not want to miss!

Thanks so much for stopping by!  Have a great weekend!

Cardstock:  Bazzill Coconut Smoothies   Patterned Paper:  Polar Bear Press “Star Surprise,” “Birthday Candle Stripes” and “Cupcake Sprinkles”  Stamps:  C.C. Designs Play Ball Bitzy Bug, sentiment from “Daphne Goes to School” and “Small Solid Shadow Spot”   Ink:  Brilliance Graphite Black, SU Old Olive, Close to Cocoa, Blue Bayou, Ruby Red   Accessories:  Creative Memories oval cutter, mat pack/needle, Black SU marker, Gray Copic marker (No. 1), mm mini star brads, mm eyelets, Crop-a-dile, Sakura 3-d black gel pen (on eyes), pop dots, waterbrush. Card size 5 ½” x 4 ¼”.

Don’t Worry… “Bee” Happy

Good morning!  I want to thank everyone for all the birthday wishes yesterday!  So sweet!   Thank you!!!!  🙂

I’ve been wanting to use this little stamp by Stampendous from their “Bee Happy” collection and Julia’s challenge today is to be inspired by music!   Woohoo!  I have a dear friend who is often telling me “Don’t worry, be happy” and even though that song drives me nuts, it kind of has a special meaning now.  If I hear it on the radio, I’m not “quite” as quick to change the station.  (But I still can’t listen to the whole song.  And as I’m reaching for the radio button, I know my friend is laughing too.  🙂 )  So anyway, I’m kind of carrying over the theme from yesterday’s post…what others see, may not necessarily be what *I* see.

Little Secret

SB1

This little bug is called “Bee Secret.”  (I’m not sure why it’s called BEE secret…I’ve never seen a bee with spots, but that’s the title on the stamp.  Regardless, I think it’s adorable.)  But a little bug keeping a secret is not the first thing that came into my mind when I saw this cute image. 

Cardstock:  SU Barely Banana, Papertrey Ink (white)   Patterned Paper:  Imaginisce “For Peep’s Sake”    Stamps:  Stampendous “Bee Secret”, Karen Foster snap stamps mini casual   Ink:  Brilliance Graphite Black   Accessories:  Copic markers, Primas, Queen & Co. “Baby Cakes” sprinkle brads, Diamond Stickles, pop dots.  Card size 4 ¼” x 4 ¼”.

There she blows!

TSB2THIS was my first thought when I saw the bug.   She is feeling kind of green…but she’s still cute! 

The patterned paper and image are both available from All That Scraps.

Cardstock:  SU Pixie Pink, Papertrey Ink (white)   Patterned Paper:  Imaginisce “For Peep’s Sake”    Stamps:  Stampendous “Bee Secret”, Papertrey Ink “Paper Tray”   Ink:  Brilliance Graphite Black   Accessories:  Copic markers, white taffeta,  pop dots.  Card size 4 ¼” x 4 ¼”.

Thanks for stopping by!  Have a great day!!  And remember…

 DWBH     

Three Peeps, a Chick and a Crack

Happy (wacky) Wednesday!  I thought it would be fun to once in a while have a day of being wacky…using stamps in a way that maybe they weren’t intended.  I’ve had a couple of goofy ideas using stamps from My Favorite Things.  (I know that comes as a shock to some of you. lol.)  They’re just so much fun!  

Three Peeps

YKS1This first card uses the new sets Eggstra Special Easter and Twisted Sentiments.   I thought it would be cute to have the egg tipping just a bit too far with the little peep looking up awaiting his fate.  Hopefully the balancer is more talented than it appears and all will be well.  

Along the bottom I used two of the tiny running chicks from Hoppy Easter.  I colored the image with Copic markers and added the white dots with a gel pen.

 Cardstock:  Papertrey Ink (white), SU Apricot Appeal   Patterned Paper:  Imaginisce “For Peep’s Sake”   Stamps:  MFT Eggstra Special Easter, Twisted Sentiments, Hoppy Easter   Ink:  Brilliance Graphite Black, SU Groovy Guava   Accessories:  Copic markers, white taffeta, mat pack/needle, white gel pen, pop dots.  Card size 5” x 5”.

I often look at things and see something other than it’s intended purpose…you knew that, right?  Well…

The Expected…A Chick

BRTHI didn’t spend much time on this card, but I wanted to show what the original image looks like (in case you didn’t already know).  The stamps are part of the Serenity Now set by My Favorite Things.   The first time I used this image I paper-pieced, as I did here.  

Cardstock:  Papertrey Ink (white), SU Chocolate Chip   Patterned Paper:  Basic Grey Pheobe Paper Pad   Stamps:  Serenity Now by My Favorite Things   Ink: Brilliance Graphite Black   Accessories:  Copic markers, ribbon, American Crafts Chestnut mini brads, pop dots.  Card size 4 ¼” x 4 ¼”. 

The UNexpected…A Crack

CRCKBut somehow, amid all of my cutting and putting back together, I saw a butt.  It’s the same image as above, but instead of cleavage, there’s a crack.  I simply drew in a couple leg lines and there it was.  Go figure!

I thought it would be funny to make a “belt” on the card (since it is obviously missing from the pants) and in doing so, I actually  learned something new.  I didn’t know how to put eyelets on ribbon without the ribbon pulling in on each side, but I figured it out.  I marked the spot where I wanted the eyelet, then I folded the ribbon in half one way, cut a small incision with my scissors, opened the ribbon and folded it the other way, cutting another small incision across the first one (like a little x).  By doing this, a small hole is created, just big enough for the eyelet to fit and there are no loose threads pulling across the back to pull in the sides of the ribbon.  (I’m certain I’m not the first to discover this, but it was kind of a “happy duh” moment for me.)

Cardstock:  Papertrey Ink (white), SU Chocolate Chip   Patterned Paper:  Basic Grey Pheobe Paper Pad   Stamps:  Serenity Now by My Favorite Things, A Good Egg by Stampin’ Up!   Ink: Brilliance Graphite Black   Accessories:  Copic markers, ribbon, WeR Memory Keepers Copper hardware, glue dots.  Card size 3 ½” x 2 1/4”.

Thanks so much for stopping by!  I have a similar post for tomorrow (but not rude).  🙂   Have a great day!

Get Well Thoughts

Good morning!  I had a very busy day yesterday, but today is all mine!  Well, it is after I run a few errands.  But first I wanted to share this card.  I made it for the mom of a fellow design team member.  It’s hard for me to make a card for someone I don’t know.  I don’t know her style or favorite colors, likes or dislikes.  I can’t tell you how many times I’ve looked at this and wondered if I should add more…or move or redo something…use different stamps.  I guess I tend to over-think things when I don’t know much about the recipient.  Hopefully this will cheer her even if just a tiny bit.

Thinking of You

TOYJM

I used the new Afternoon Tea designer paper from Stampin’ Up’s Occasions mini catalog.  I have to say I love every pattern in that package.  (Most times I only like about half and the rest ends up contributing to my ridiculously huge stack of patterned papers until I force myself to use them or give them away.)  But I’m certain you’ll be seeing the other Afternoon Tea patterns soon.  They’re gorgeous (at least *I* think so.)

Totally inspired by the paper, I used flowers from Silhouette Blooms I by Cornish Heritage Farms.  I used markers, coloring directly onto the rubber.  I thought about sponging the edges of the focal piece but opted instead for the scattered faux stitches.  I faux stitched around the edges of the patterned paper and adhered that piece to a block of the brown patterned paper cut to the size of the card front.  I added the three brads in the corner, then adhered the assembled piece to the card base of white cardstock.  (I like to assemble everything and then attach to a base so I don’t have brad prongs and stitch holes all over the inside of the card…but I don’t always plan ahead so well, especially with the stitches, and I sometimes end up with those tiny holes on the inside anyway.  But I try not to do that when possible.)

Thanks for stopping by!  I’m hoping to get some things done today for a “Wacky Wednesday” post tomorrow.   😉   Have a great day!

Cardstock:  Papertrey Ink white   Patterned Paper:  SU Afternoon Tea DSP   Stamps:  Silhouette Blooms I and Classic Essential Expressions by Cornish Heritage Farms   Ink:  SU Chocolate Chip   Accessories:  SU markers (Blush Blossom, Cameo Coral, Sage Shadow, Close to Cocoa, Chocolate Chip), mat pack/needle, We R Memory Keepers copper hardware, pop dots.  Card size 5 ½” x 4 ¼”.

Soda and a Bug with a Cake

Well, that’s certainly an odd combination, huh? 🙂  Good morning!  I have a couple more samples today using Petite Phrases by Lizzie Anne Designs.

i soda like you

ISLY1For this design, I used Basic Grey’s Two Scoops.  I thought the background paper was perfect for wallpaper.  I used punches to make the “tablecloth” and split the sentiment, one word per line, to make the little sign (which is popped up on a dimensional).

The actual soda image looks like the soda on the right.  For the soda on the left, I omitted the cherry stem and straw, stamped the soda, then used a black marker to draw the straw and the cherry stem turned in toward the center.  The foam/whip is cut out and popped up and the cherries are little Dahlia rhinestones from Me and My Big Ideas.  The tiny brads are Queen & Co. sprinkles.  Card size 4 1/4″ x 4 1/4″.

you take the cake

YTTC1I used a combination of three different images for the focal panel…the bug, the cake and then the flower is from the hat in the set.  The little flower and the bug’s head are both raised on dimensionals (or pieces of dimensionals).  The dotted circles on the yellow/gold background are from another Lizzie Anne set, Funky Floral.

The little black dots were added using a 3-d black gel pen and the papers are all from the Silver Lining line by We R Memory Keepers.  Card size 4 1/4″ x 4 1/4″.

I hate to run, but I have to!  Thanks so much for checking in!  I’ll be back soon!  Have a great day! 

More Silhouette Blooms

Hello!  I hope you are all enjoying your weekend!  I’m so sick of being cold…and having a cold…I’ve had enough of winter and am looking forward to spring!   We were in DC yesterday for my son’s six-month post-surgery MRI and decided to lunch in Georgetown.  Well, of course the parking is terrible so we had to do some walking and it felt like 10 below with that wind.   (I’m exaggerating but it was really cold.)  The kids and I were chilled to the bone.  We ended up popping into Johnny Rocket’s for some burgers.  It was ok, but I think the waitress had some of our onion rings on the way to our table…$4 for 12?!  And some were very small.  Wow.  lol.  Oh well.  It was different.  Anyway…

Birthday Wishes

BWSH

I thought I’d brighten things up a bit using one of my favorite Stampin’ Up colors, Cameo Coral. (Although I can’t seem to photograph it well…it looks a little too bright here.)

I used Silhouette Blooms I and II from the Kim Hughes collection by Cornish Heritage Farms

I colored directly on the stamps with Stampin’ Up markers using Certainly Celery for the stems and Blush Blossom and Cameo Coral for the blooms.  I wanted all of the flowers to be nice and bright, but to get the variations of the stems, I did something a little different.  On the center stem, I colored with the Celery marker, added the flower colors and stamped.  For the stem on the left, I colored the stem, stamped off lightly onto scrap paper, then I ran the marker just along the edges of the stem and leaves, colored the flower and stamped.  On the right, I only re-inked the flower, huffed to re-moisten (lol-that always cracks me up) and stamped.  Doing this gives just enough variation so that all the stems aren’t either really dark or really light.

The background pieces were both stamped in Cameo Coral using the Burlap backgrounder, also by Cornish Heritage Farms.  I didn’t have ribbon to match so I colored white taffeta with a Light Prawn Copic marker.  (I love being able to do that!)

Thanks for looking!!  Have a great rest of the weekend! 

Cardstock:  SU Cameo Coral, Whisper White   Stamps:  Silhouette Blooms I & II from the Kim Hughes Collection by Cornish Heritage Farms, Burlap Backgrounder by Cornish Heritage Farms   Ink:  SU Cameo Coral, Brilliance Graphite Black   Accessories:  Certainly Celery, Cameo Coral and Blush Blossom SU markers, edge distresser, brushed gold eyelet, Crop-a-dile, SU white taffeta, Light Prawn Copic marker.  Card size 5 ½” x 4 ¼”.

A Special Delivery…and Chocolate

It’s the weekend…and it’s a busy one for us.  Something to do every day, but before I do all I need to do, I want to share a couple things using a new release by Lizzie Anne Designs called Petite Phrases

special delivery 

SDLAD

I don’t know what it is about baby cards, but I just love making them.  Here, I paper-pieced the little sack to match the paper covering the base, but before I adhered it, I added an extra baby.  I used my Stamp-a-ma-jig to place the extra head on the one side, then I drew in some tiny feet above the others.

I used a 1 3/8″ circle punch to cut the rounded end of the blue strip.  I cut the width of the strip to barely fit the width of the circle punch, inserted the strip in the punch as usual, but then I pulled the one end out through the circular hole.  That way I was only punching the rounded end on one side.  It’s easy to do with the word window punch too when you have a phrase or need a tab that’s longer than the punch.  It isn’t a “new” idea, but one I often forget about.  Paper is by Fiskars Cloud 9 Design “Baby Boy” Stripes and Dots.  Card is 4 1/4″ x 4 1/4″.

need chocolate?  (Who doesn’t? 🙂 )

NC1

I don’t know about you all, but I could *always* use some chocolate!

I did some paper-piecing again here.  When it works out, it’s just so much easier than trying to match marker or ink colors to the paper and I like the replication of the print or texture (or maybe I’m just obsessed with the technique).  I used a 3-d black gel pen to add the tiny swirls of dots (which were already on the image…I just highlighted them).  The center chocolate on the 3″ x 3″ card is popped up on a dimensional, as is the focal panel.  The goody box is by Martha Stewart (3″ x 3″ x 2″).  I covered each side and the top with the brown patterned paper, added some brads to the strip of striped paper and adhered the strip to the box.   Paper is Bo Bunny “Paris Blossoms” and “Paris Romance.”

Thanks for stopping by!  Look for a couple more Petite Phrases samples soon!  Have a great day!  🙂

Window to a Friend

Good morning!  I can’t believe it’s Thursday already.  This week sure did fly. Today, Julia’s Ways to Use It Challenge at Splitcoast is to incorporate windows into a design.  I didn’t think I’d have time for this one, but this idea popped into my head this morning so I hurried to get it finished. 

HF1

I thought it might be cute to have two friends in their separate windows chatting on the phone.  The Elzybells “Gossiping Girls” are stamped on the inside of the card. (Have you seen the new Spring Elzybells?  Oh my gosh, they are SO cute….and yes, I already placed my order.  🙂  But I only got three.  I was ‘kind of’ good.)

I used my Stampin’ Up circle punches (1 1/4″ and 1 3/8″) and the scalloped flower punch.  The scalloped flower is raised on dimensionals with a tiny ring of green adhered to the rim of the punched hole.

The sentiment is from Classic Essential Expressions by Cornish Heritage Farms (I *love* this set).  Paper is from Basic Grey’s Two Scoops with a base of white from Papertrey Ink.  Images colored using Copics.

Sorry for the choppy post, but I’m running short on time.  Thanks for stopping by and have a great day! 🙂

Belly Button Bling, Chapter 3

It’s time for another Dirty Dozen/Dirty Dozen Alumni challenge.  This time the focus is to use stamps designed by fellow Dirty Girls or as an alternate choice we could semi-case something by a fellow Dirty Girl .   The required element is to use a Spring color combination with a restriction of no diecut/embossing machines (i.e. Cuttlebug).  So I decided to use one of Lisa Strahl’s backgrounders from Cornish Heritage Farms and semi-case myself.

If you’re a member of the Splitcoast Fan Club, you may remember this card that I made in November 2005.  (You can only see it if you’re a Fan Club member.  If you’re not a Fan Club member, you can get details on joining here.)  So in this first card, my girl is wearing her little denim skirt, showing off her hip belly button bling.  Well, some time went by and she met this great dude, got married and sported this little number…which has, in turn, lead to this:

HMS1

Yes, she’s in the “family way.”  She’s still hip, but she’s had to put away the belly button bling…for a while, anyway. 

I followed the same premise as the lingerie card but added a lot more curves.

I thought it would be nice to have a matching gift bag to go along with the card so I made my own (nice and round… like her belly).  Here’s how I did it:

Cut two 6 1/2″ circles from the dark plum cardstock and two 6 1/4″ circles from the light plum cardstock.  I stamped the Large Polka Dot backgrounder using vanilla craft ink on the light plum circles.  (Since the circles were wider than the stamp, I used my stamp-a-ma-jig to line up the dots for the remaining part of the circle.)   Remove 1/2″ from the bottom of each circle and adhere the lighter pieces to the darker ones.

PSL1

For the sides, cut two 8″ x 2″ strips of dark plum cardstock. Score in 1/4″ along each long side.  Score in 3″ from one short side on each piece.  From this 3″ score line, snip along the length of the strip, only going in as far as the 1/4″ score line.  (Don’t snip past the 3″ score line.)

.

.

PBGS1

Adhere the first side piece, aligning the 3″ score line with the bottom corner of the bag.  Continue adhering up the side of the bag, bending the side piece to fit along the curve.

.

.

.

PBSS

Begin adhering the second side, aligning the 3″ score line of the second strip with the other bottom corner of the bag,  overlapping the 3″ lengths of the strips on the bottom.

Apply glue (or your adhesive of choice–I use Tombow Mono Multi) to the exposed tabs and bottom edge and adhere the second side of the bag, aligning the edges with the curve of the side.  I poked my scissors down inside the bag to help with alignment.

For the handles, cut two 9 1/2″ x 3/4″ strips of dark plum cardstock.  Adhere each end to bag using big brads.

I can’t wait to see what the other DDG’s have created!  Click here to see.  Thanks so much for looking!!!  Have a great day!

Cardstock:  SU Creamy Caramel, Perfect Plum, Pale Plum   Ink:  SU Creamy Caramel and Vanilla craft   Stamp:  Large Polka Dot backgrounder by Cornish Heritage Farms   Rub-ons:  Deja Views ‘Congrats,’ One Heart One Mind ‘A Mother is…’ and Lil Davis Designs ‘Black Alphabet’   Accessories:  Karen Foster Biggie Brads, ribbon, Creative Memories Circle Cutter, 1 ¼” and 1 3/8” circle punches, pop dots, sponge.  Card size 4 ¼” x 5 ½”.

Some more Monkey Fun

Happy Sunday!  We’ve been really busy moving around quite a few things so that I can set up my very own stamp room.  Can’t begin to tell you how excited I am about that!  The house is a mess, but we’re making progress!  I need to get busy, looking for some furniture.  WOOHOO! 🙂   Since I have to clean and sort through my mess of stamp stuff, I thought I’d fit in a bit of playing here and there.  It took me a while, but I was able to finish these two cards using the latest release by C. C. Designs, “Monkey Love.”   (Most of the supplies are from All That Scraps.)

I had some of this Piggy Tales patterned paper left and thought it would be perfect with the monkeys.  It’s the “Peter, Peter Pumpkin Eater” line.  All the papers are double-sided, making coordination of colors and prints super easy. 

Temp Rem
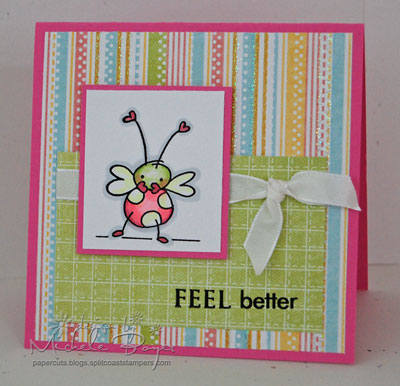
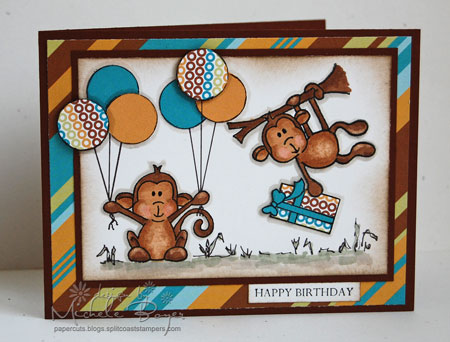
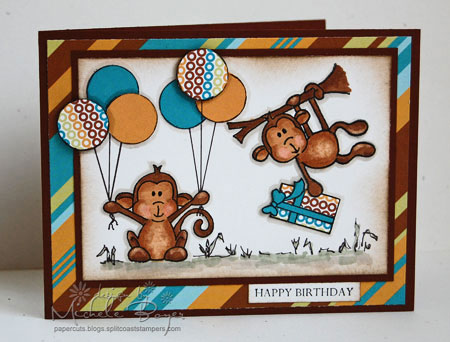
For this first card, I used a 3/4″ circle punch for the balloons.  The patterned ones are raised on pop dots.  Once I drew in the strings and adhered the balloons, I decided they needed more definition so I carefully outlined them with a black marker.  The package is from
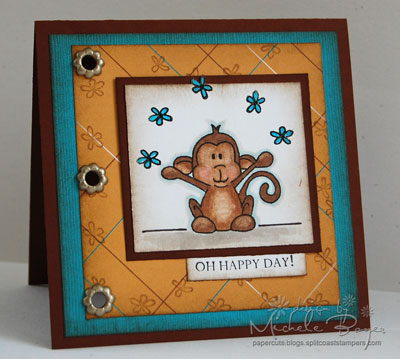
 Lucky’s Christmas Wish.  I first stamped the package onto the patterned paper and cut it out.  Then stamped again onto the turquoise paper, cutting out only the ribbon and bow.  I stamped the hanging monkey a second time so I could cut off his arm and adhere it over the package.  The ground/grass was scribbled in with a black marker.  I added some color then sponged all the edges.

OHDCCDMLI used a scrap of the patterned paper for this little 4 1/4″ square card.  I stamped the flowers as if the monkey were juggling, then randomly stamped them again onto the square of patterned paper.  I stumbled upon these flower eyelets at Michael’s in the sewing section. 

Better get back to the moving!  Thanks for looking!  Enjoy the rest of your weekend!  I’ll be back soon!  (Oh, she’s picking a winner tonight -Sunday- so there’s not much time, but Lindsey is having a give-away on her blog if you’re interested!)

CardstockBazzill Basics Chocolate Cream, Bazzill Coconut SmoothiesBazzill Artesian Pool Grass   Patterned Paper:  Piggy Tales Peter, Peter, Pumpkin Eater Collection “ Peter,” “Pumpkin Eater” and “Pumpkin Shell”   Stamps:  C. C. Designs “Monkey Love, “Lucky’s Christmas Wish” and “Flowers”; sentiments from Classic Essential Expressions by Mona Lisa Moments from Cornish Heritage Farms   Ink:  Brilliance Graphite Black; SU Close to Cocoa; Ranger Walnut Distress   Accessories:  Copic markers, black Stampin’ Up marker, ¾” circle punch, Sakura clear 3-d gel pen, Dritz flower eyelets, sponge, pop dots.