Monthly Archives: July 2017

Taylored Expressions August Previews – Day 1 If the Broom Fits and Everyday Blessings

Welcome to Day 1 of Taylored Expressions‘ August 3 release previews! I had so much fun with this month’s new stamps and dies. Be sure to check out the rest of the team’s previews too! You can find links on the TE blog today.

Taylored Expressions Peek-a-Boo Halloween

My first sample uses super cute Peek-a-Boo Halloween with coordinating dies. Of the three images in the stamp set, I used the owl.  (She’s looking a bit intense, don’t you think? Haha.)

Taylored Expressions Peek-a-Boo Halloween (close-up)

Copic markers – BG11, BV04, BV13, C1, C2, C6, C7, C9, YG03, YG06, YG17, YR09, YR15, YR16, YR18

She was stamped in Oreo ink, colored with markers and die-cut, then placed atop a Little Bits Broom. I die-cut Oreo card stock using Starry Night Cutting Plate, leaving some of the stars in place with some removed to show the Potato Chip card stock from beneath.

Next, I used lovely new Happy Flowers Background. I paired it with a sentiment from another new set, Simply Stamped Pumpkins.

Taylored Expressions Happy Flowers Background

The sentiment was stamped and layered onto Label Stacklets 2 with foam tape tucked beneath the bottom layer for a bit of added dimension.

Taylored Expressions Happy Flowers Background

Copic markers – Y21, YG03, YG06, YG17, YR15, YR27

After coloring with markers, I added Glossy Accents over the dots and flower centers.

Taylored Expressions is celebrating Release Week with some fabulous giveaways! Visit the TE Blog to answer Taylor’s Question of the Day for a chance to win a prize from the latest release!


question of the day

I’ll be back tomorrow with more previews! Hope to see you then!

Thanks for visiting!

1amichele siggy

Life’s a Beach (stamping bella)

Hi everyone. It’s another Bellarific Friday with Stamping Bella

My card today features three new sets from Stamping Bella’s latest release – Summer Sentiments and two from the new Littles line. Oh how cute they are! I love piecing together scenes.  🙂

Stamping Bella Little Ice Cream & Lemonade/Palm Tree

I used elements from Littles Ice Cream & Lemonade (with coordinating dies) and Littles Palm Tree (also with coordinating dies).

July 28

Above is the inspiration photo we were to use. I went (mostly) with the color scheme as well as the beach theme.

Stamping Bella Little Ice Cream & Lemonade/Palm Tree (close-up)

Copic markers – B02, B04, B05, B06, BG11, E00, E01, E11, E31, E33, E35, E37, E50, E51, E53, R01, R02, Y21, YG03, YG06, YG17

All pieces were stamped onto white card stock and colored with markers. I die-cut the water and sand hill using a Paper Smooches’ Borders 1 die.

Next week’s challenge is to create anything you’d like. Use any current Stamping Bella image then email your card to [email protected] by next Thursday to be featured on the SB blog and to be entered to win some Bella Bucks! (All challenge details can be found HERE.)

Thanks so much for stopping by!

1amichele siggy

Stamps: Stamping Bella Littles Ice Cream & Lemonade (and dies), Littles Palm Tree (and dies), Summer Sentiment Set   Dies: Paper Smooches Borders 1  Ink: Taylored Expressions Oreo  Paper: Taylored Expressions Salt Water TaffyX-Press It Blending Card, MFT In the Buff and Lush Lagoon Other: Copic markers, foam tape.

Paper Smooches August Release Hop

It’s Pep Rally week and we are here today to share a sampling of the NEW Paper Smooches AUGUST 2017 release!  TWO new stamp sets and FOUR new dies will be available to purchase at 8:00 p.m. PT on July 31st. You will find our new products HERE once they go live.

To add extra fun to our hop, we are offering a $25 gift code to choose what you like from the PS online store.

Here are the details:

  • FOUR winners will be chosen at RANDOM from any of the design team blogs and the PS Blog to win the $25 prize.
  • Just leave a comment on any of the design team blogs listed below or the PS blog for your chance to win!  (You do not need to comment on all blogs to qualify but it increases your chances.)
  • Deadline: You have until midnight PT on Sunday, July 30th to leave a comment.
  • Please check the Paper Smooches blog on Monday, July 31st to see if you are one of the FOUR lucky winners.

To increase your chances of winning:

  • Tell us that you Facebooked about our blog hop.
  • Tell us that you Tweeted about our hop.
  • Tell us that you posted on your blog about our blog hop.

Today I’ve used new Wavy Wishes stamp set, coordinating icons dies and Wavy Pattern die.

Happy-Christmas-500

Wavy Wishes is a super cute set which includes sentiments to cover a few different occasions, some of which fit perfectly inside the Wavy Pattern die.  There are also a couple of birds, leaves, ornaments and holly.  Really cute. 🙂

Happy-Christmas-CU

Be sure to hop along and comment with the rest of the DT to increase your chances of winning one of four $25 gift codes.

 Thanks for visiting!  Good luck, and happy hopping!

1amichele siggy

Stamps: Paper Smooches Wavy Wishes  Dies: Paper Smooches Wavy Wishes Icons, Wavy Pattern  Ink: Delicata Golden Glitz  Paper: Taylored Expression Sugar Cube  Other: Foam tape, adhesive pearls

Hope (paper smooches)

Hi everyone! Today I’m sharing a card I created using a couple of Paper Smooches‘ latest releases.

Paper Smooches Dove and Religious Words 2 dies

The Dove and Religious Words 2 dies are handy for so many occasions…get well, encouragement, Christmas, wedding, etc, and they’re great for quick and easy greetings.

Here, I simply die-cut both from white card stock then adhered over a watercolor panel, colored with a Zig Clean Color Real Brush marker. I used a Copic marker (BG10) to lightly fill in the eye and leaves.

Paper Smooches Dove and Religious Words 2 dies (close-up)

I finished my card by tieing on a bit of silver cord and adhering a few super sparkly white Petite Posies from Queen & Company (a “must have” in my stash. I seriously love them and the white goes with everything).

Thanks so much for stopping by today!

1amichele siggy

Your Life is a Canvas (stamping bella)

Hi everyone! Today I did a bit of playing around with Copic’s Various Ink and Colorless Blender.

Watercolor background using Copic Various Ink

Last week I watercolored with Various Ink. Today I created a simple, very colorful rainbow background for Stamping Bella‘s Uptown Girl Abigail the Artist.

Your-Life-is-a-Canvas-CU

Copic Various Ink – R29, Y17, Y13,B05; Copic markers – B05, B24, C1, C2, C3, E00, E01, E11, E30, E31, E35, E37, E40, E42, E50, E51, E53, G07, R00, R01, R24, R29, R59, RV19, RV32, RV66, Y17, Y21, YG03, YG17

It was so easy. Here’s what I did:

Watercolor background using Copic Various Ink - Step 1 Saturate card stock with Colorless Blending Solution

First I saturated a block of watercolor paper with Colorless Blender.

Watercolor background using Copic Various Ink - Step 2 Apply drops of ink to top edge of card stock

Across the top I added two or three drops each of R29, Y17, Y13 and B05 Various Ink, overlapping the drop edges just a bit with each additional color.

Watercolor background using Copic Various Ink - Step 3 Stand cardstock in box to allow ink to run down card stock panel

I stood the paper inside an old shoe box, allowing the inks to run down the paper. Where needed, I applied additional drops of ink to cover to the bottom.

Watercolor background using Copic Various Ink - Step 4 Drop additional ink if needed to cover card stock panel

Once dried, I die-cut the panel and assembled my card.

Finished card

I used my MISTI to easily stamp the bottom line of the sentiment in a rainbow of colors.  🙂

Close-up of sentiment

Comment below to let me know what Various Ink techniques you’ve tried. Thanks for visiting today!

1amichele siggy

Stamps: Stamping Bella Uptown Girl Abigail the Artist  Dies: Taylored Expressions Stitched Square Stacklets  Ink: Taylored Expressions Oreo; My Favorite Things Wild Cherry, Orange Zest, Lemon Drop, Green Room, Lush Lagoon  Paper: Taylored Expressions Sugar Cube and watercolor card stock, X-Press It Blending Card  Other: Copic Various Ink (R29, Y13, Y17, B05) and Colorless Blender, Copic markers (noted below close-up photo).

Christmas in July (stamping bella)

Hi everyone! This week with Stamping Bella, it’s Christmas in July. One Christmas card done, about 49 to go! (I will *not* be making 49 of these. That would be a LOT of coloring.)

Stamping Bella Uptown Girl Savannah has a Star

Uptown Girl Savannah Has a Star is one of my all-time favorite Christmas images. I love coloring the skirt. 🙂

Stamping Bella Uptown Girl Savannah has a Star

Copic markers – BG70, custom BG72, C1, C2, C4, C5, E00, E01, E09, E11, E53, E59, E79, G05, G12, G14, G28, R00, R01, G27, G29, G59, Y0000, Y000, Y11, Y21, YG17, YR14, YR18, YR23

After coloring with markers, I adhered several Queen & Company star sequins then stitched lines so the stars look as if they are hanging.

Next week’s challenge includes this inspiration photo:

July 28

Use any current Stamping Bella image then email your card to [email protected] by next Thursday to be featured on the SB blog and to be entered to win some Bella Bucks! (All challenge details can be found HERE.)

Thanks so much for stopping by!

1amichele siggy

Stamps: Stamping Bella Uptown Girl Savannah Has a Star  Ink: Taylored Expressions Oreo  Paper: Taylored Expressions Sugar Cube, X-Press It Blending Card, Recollections Gold Shimmer Other: Copic markers, Queen & Company Sequins

Watercoloring with Copic Various Ink

Photo-16

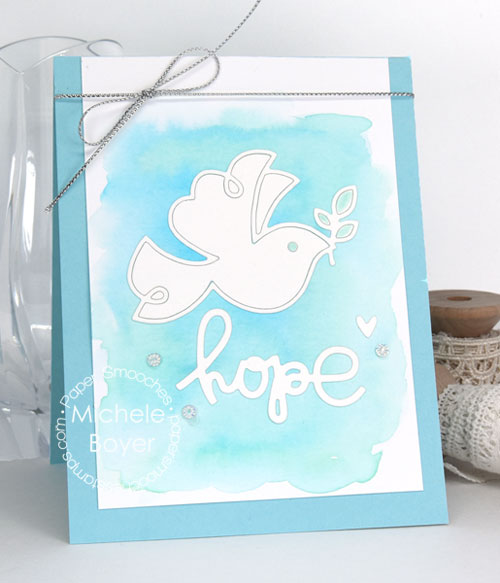
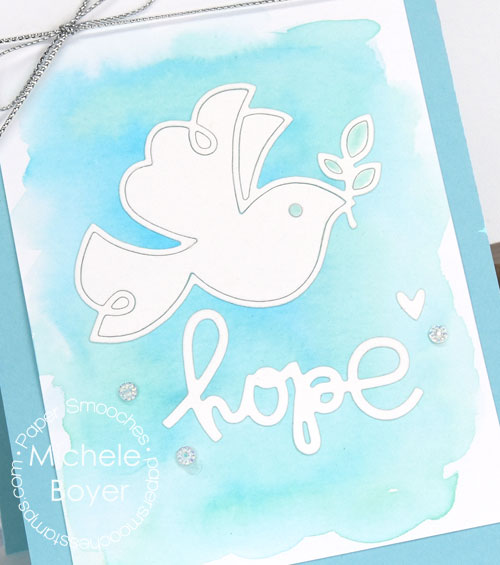
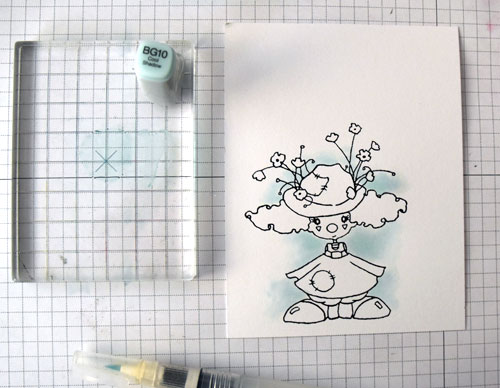
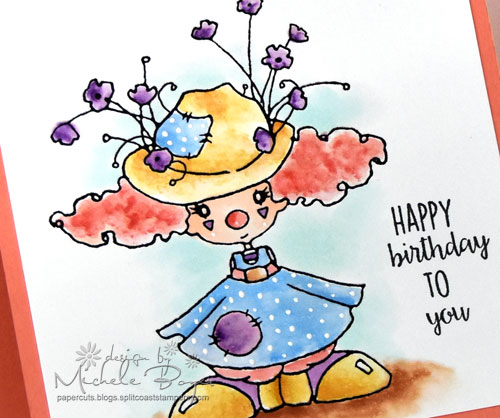
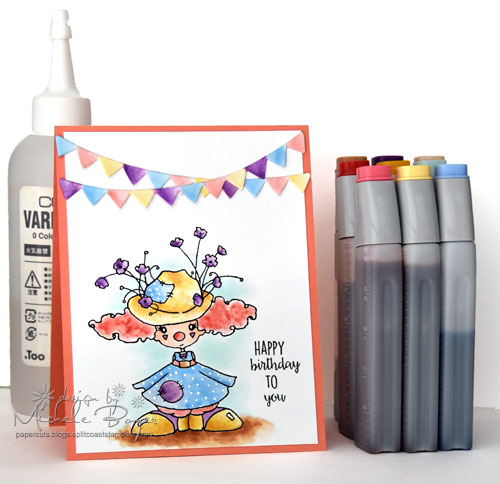
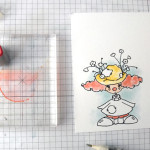
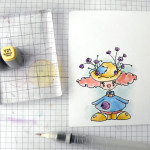
Hi everyone! Today I’m sharing how to create a watercolor look using Copic Various Ink. It’s a fun technique that mimics watercolor although there is no water involved.

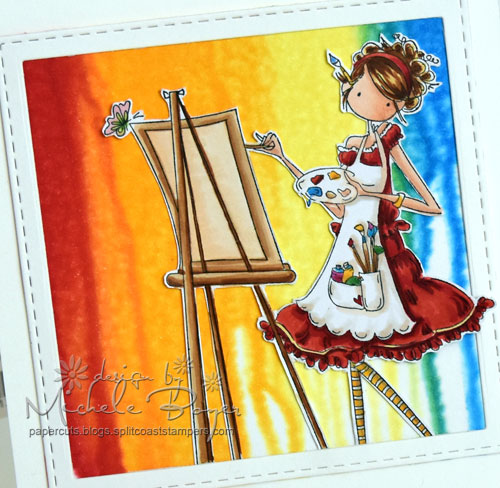
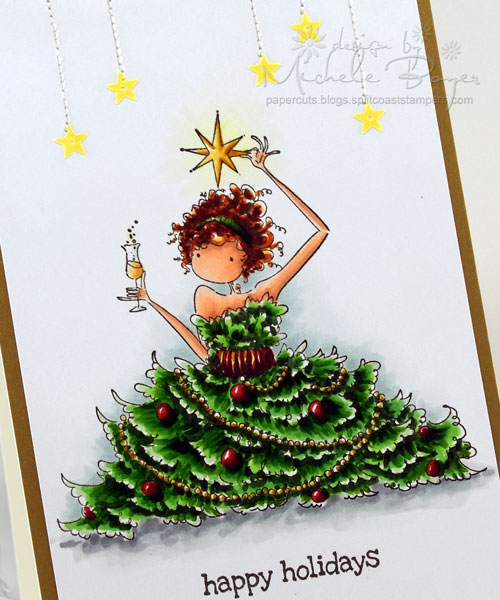
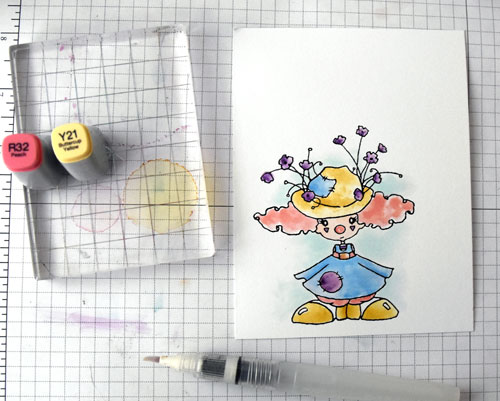
I used several ink refills (B32, BG10, E00, E33, R24, R32, V09, Y21, YR23) and Colorless Blending Solution to paint Miss Polly Clown digital image by A Day for Daisies. I think the style of A Day for Daisies’ images is perfect for watercolor.

Photo-14

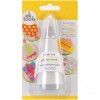
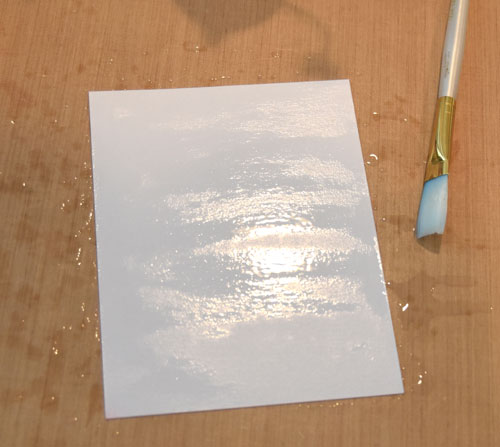
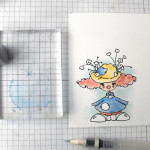
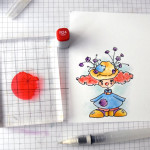
I simply applied a drop or two of ink onto one end of a large acrylic block then used a waterbrush filled with Colorless Blender to pick up the ink and apply to watercolor paper. I would have used a paint pallette but a certain (not so) little artist in my family is currently using it. At times throughout my coloring, I was not satisfied with the flow of Colorless Blender from my water brush so I dropped several drops of Colorless Blender onto the other end of my acrylic block and used the brush to pick up both (Colorless Blender first then the ink). In between colors, I cleaned the brush and acrylic block with additional Colorless Blender.

If you have no Various Ink on hand, the technique can be achieved with markers and Colorless Blender. Note that the color concentration will be less than that of the Various Ink so you’ll have to scribble a considerable amount of ink onto the acrylic block. Simply pick up with a Colorless Blender-filled waterbrush, or a paint brush dipped into Colorless Blender to apply.  Regardless of whether Various Ink refill or marker is used, the resulting color will be lighter as the amount of Colorless Blender increases.

Photo-2  Photo-3  Photo-4

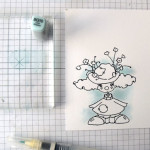
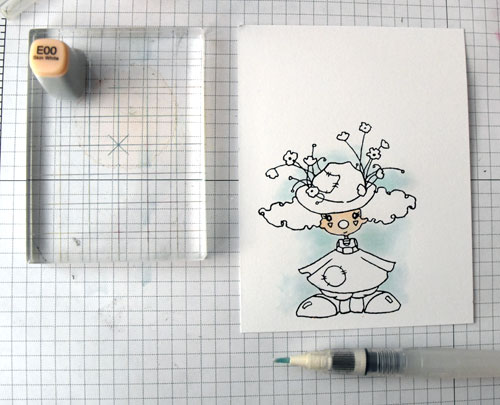
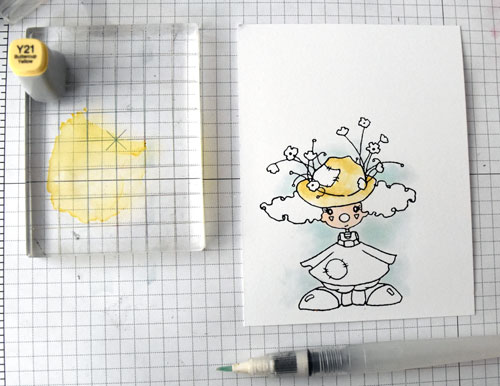
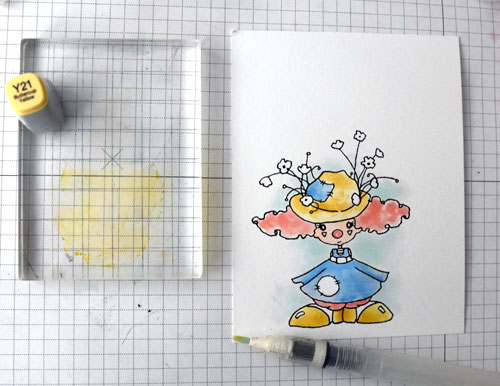
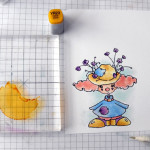
I started with the background, using BG10 to fill in color around the image. The Colorless Blender helps to fade the color out as the brush is moved further away from the image. Next, I colored the skin (E00) and then the hat (Y21).

Photo-5  Photo-6  Photo-7

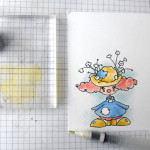
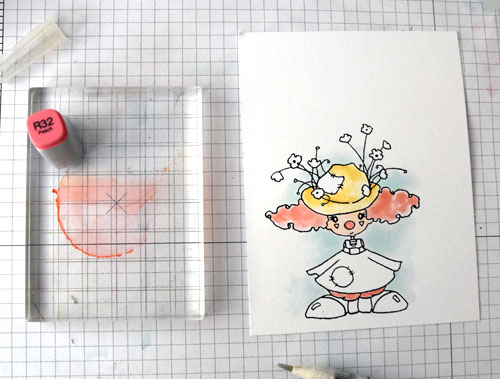
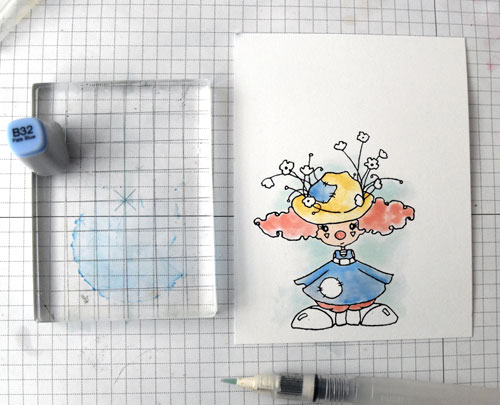
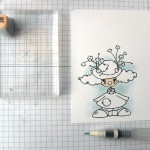
On the hair and britches, I used a base color of R32. After coloring the dress and hat patch with B32, I returned to Y21 to color portions of the shoes.

Photo-8  Photo-9  Photo-10

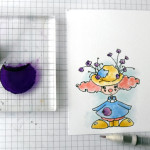
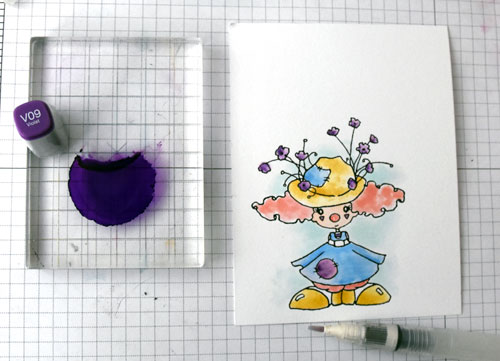
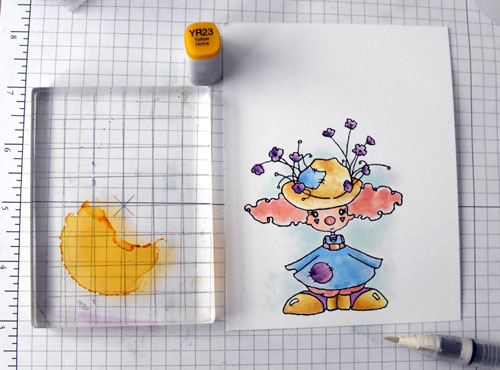
While V09 is a highly pigmented ink, the Colorless Blender allows for a very light application. I used only a tiny bit of V09 with the Colorless Blender on the dress patch, shoes and flowers. Once dried, I added a bit more color to create depth and variation. Next, I used R32 and Y21 to add a bit more color variation to the hat and hair, then used YR23 to create darker shadow on the hat and shoes.

Photo-11  Photo-12

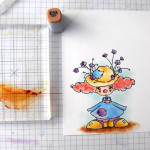
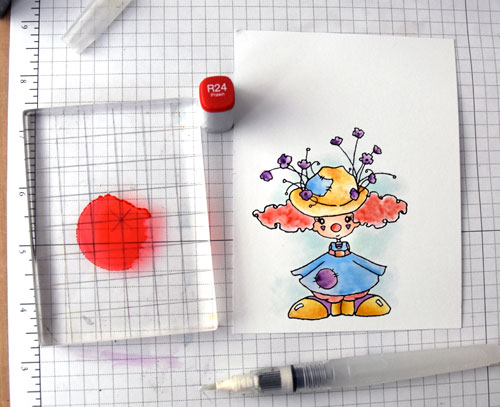
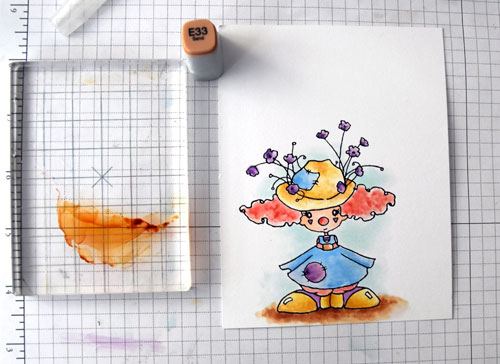
To add even more variation to the hair, I added a bit of R24 then grounded my cute clown with E33.

Photo-13

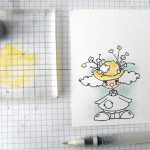
Once I was satisfied with the coloring, I used Copic’s Opaque White to add bright white dots to the dress and patch on the hat. I also added a tiny dot beneath each triangle on the cheeks.

To finish my card, I stamped a sentiment from Stamping Bella‘s Tiny Townie Birthday Party then die-cut (from watercolor paper) and colored a Taylored Expressions Skinny Mini Party Border.

I hope you’ll try this fun technique. When you do, please come back and comment below with a link to your art. I would love to see it!

Thanks for visiting!

1amichele siggy

Take a Deep Breath (paper smooches)

Hi everyone! Today I’m quickly popping in with a very simple card using Paper Smooches‘ new Body Language stamp set and coordinating die. The Body Language stamp set is this month’s Thanks a Million (TAM), free with any $60 retail order through July 31st. It’s full of cute “guts” with fun sentiments to match. 🙂

Paper Smooches - Michele Boyer

I used the pair of lungs, set within the die-cut shape, stamped onto X-Press It Blending Card and colored with markers.

Paper Smooches - Michele Boyer

Coipc markers – RV11, RV32; Copic Opaque White

After coloring with markers, I added a tiny white dot to each cheek using Copic’s Opaque White. The pretty patterned paper is one of my all-time faves, Heart Throb by Queen & Company.

Thanks for visiting today! I’ll be back soon.

1amichele siggy

Supplies:  Body Language stamp set and dies, Copic markers and Opaque White, Taylored Expressions Stitched Square Stacklets and Sugar Cube card stock and Oreo ink, X-Press It Blending Card and 1/4″ foam tape, Queen & Company Heart Throb Mat Stack. Finished size 4 1/4″ x 4 1/4″

Shaker Thanks and Hearts (Queen & Company)

Hi everyone! Today I have two cards to share using some of my favorite patterns from Queen & Company‘s Heart Throb paper pad. The paper is part of the Heart Throb shaker kit, but is also available singly (which is a good thing because I’ve already used all of the paper that came with the kit). Refill foam shapes are also available HERE.

Thanks-Bunches-500

On my first card, I used Heart Throb paper with a Waves Shaker Card Kit.  The kit includes a card base, precut foam, acetate and a white card front.

Thanks-Bunches-CU-500

After adhering the patterned paper, I adhered the foam, filled with Heart Throb toppings and then added the acetate and card front. A simple tag with a sentiment from Paper Smooches (Many Thanks) was adhered then tied with gold cord.

Hello-Love-500

Next I used more Heart Throb paper with the heart, hello and love dies that are included in the Heart Throb kit.

Hello-Love-CU-500

To a bit more dimension to the words, I die-cut three pieces of each and stacked them together for a “chipboard” look. The tiny flowers are toppings from the kit as well.

Both cards were so quick and easy. If you haven’t already, I recommend trying some of the Queen & Company kits. They are SO much fun (to make AND receive)!  🙂

Thanks so much for visiting today!

1amichele siggy

Life is Unfair (stamping bella)

Hi everyone! Welcome to another Bellarific Friday with Stamping Bella! This week I’ve used Grumpy Squidgy. (I love that face! Haha.) You can find more Squidgies HERE, some grumpy, some not.

Stamping Bella - Grumpy Squidgy

For last week’s challenge, we were to use this sketch:

July 14

I love sketch challenges. Having the layout ahead of time takes away half (if not more) of my work.  🙂

Stamping Bella - Grumpy Squidgy (close-up)

Copic markers – BG70, custom BG72, E00, E01, E11, E31, E35, E37, E51, E53, E59, R01, R02, R85, RV32, Y21

After coloring with markers, I paper-pieced the dress then added bits of shading to the patterned paper.

Next week’s challenge is to create something for Christmas in July. Fun! Use any current Stamping Bella image then email your card to [email protected] by next Thursday to be featured on the SB blog and to be entered to win some Bella Bucks! (All challenge details can be found HERE.)

Thanks so much for stopping by!

1amichele siggy