Monthly Archives: October 2017

Naughty or Nice?

Hi everyone! Today I have two cards to share using Santa Card dies from Paper Smooches.

Boxed-Greetings-500

This die set is so much fun! If you click HERE to see the Santa die set, you can also see several different interpretations, some of which are not holiday related at all. (SO fun!)

Boxed-Greetings-CU

In Santa’s beard, I stamped a sentiment from Boxed Greetings, using tape to mask out the “box” portion around the words. Boxed Greetings is available to you for FREE with any $60 retail purchase through 10/31.

Boxed-Greetings-CU2

By simply changing card stock colors and eliminating the mustache, I created an elf. I also changed the button color. Instead of using black as on Santa’s suit, I die-cut the button from shiny gold. Again, I stamped a sentiment from Boxed Greetings without the box.

I’d love to see your cards created with Santa Card dies. Please link below!

Thanks for stopping in today! I’ll be back soon.  🙂

1amichele siggy

blessed (stamping bella)

Hello. It’s Friday so that means it’s time for another challenge with Stamping Bella! This week I used Hedgie and His Acorns from The Littles Fall Collection.

Stamping Bella The Littles Hedgie & His Acorns

We were to use this sketch for inspiration:

Oct 13

I like to keep my designs pretty simple so I used the same pattern for each block surrounding the main/focal square.

Stamping Bella The Littles Hedgie & His Acorns (close-up)

Copic markers – E08, E30, E31, E33, E35, E37, E47, G21, G24, G94, YR12, YR14, YR15

After Hedgie was stamped onto X-Press It Blending Card, I colored with Copic markers then die-cut using his coordinating die.

I stamped the sentiment, from Fall Sentiment Set, onto a block of white card stock then trimmed the bottom to a flag shape. To easily die-cut the stitched edge, I placed the sentiment strip just over one side of a stitched square die and ran it through my Big Shot.

Next week’s challenge is to incorporate circles into our design.  Use any current Stamping Bella image then email your card to [email protected] by next Thursday to be featured on the SB blog and to be entered to win some Bella Bucks! (All challenge details can be found HERE.)

Thanks so much for stopping by!

1amichele siggy

Stamps: Stamping Bella The Littles Hedgie and His Acorns, Fall Sentiment Set Dies: Stamping Bella Hedgie and His Acorns Cut It Out, Taylored Expressions Stitched Square Stacklets  Ink: Taylored Expressions Oreo, Chocolate Truffle  Paper:  X-Press It Blending Card, Taylored Expressions Sugar Cube; Sugar Pea Design Countryside Charm  Other: Copic markers, sequins

trick or treat (stamping bella)

Hello everyone. Thanks for popping in.  🙂

Today I decided to switch gears and move from Christmas back to Halloween. Time goes by so quickly and I still have stamps from Stamping Bella‘s previous release that I’m anxious to get inky.

Stamping Bella Little Bits Witches and Haunted House

Here’s a peek at Little Bits Witch paired with Little Bits Haunted House.  I also used a sentiment from Fall Sentiment Set.

Stamping Bella Little Bits Witches and Haunted House (close-up)

Copic markers – E00, E01, E31, E33, E35, G09, G16, N5, N7, N9, R01, V15, V17, Y21, YG06, YG09, YR14, YR15, YR23

I stamped both onto white card stock then colored with Copic markers. I thought it would be fun to add a little streak of green to the witch’s hair.  🙂

After coloring, I die-cut each with its coordinating die and popped the witch up on clear foam squares. I also added a couple of bats die-cut from Taylored Expressions Skinny Mini Halloween Borders. (Patterned paper from Doodlebug Designs Halloween Parade 6×6.)

Thanks for visiting!  🙂

1amichele siggy


peace & love (paper smooches)

Hi everyone! Today I’m popping in with a card I created using one of Paper Smooches‘ latest releases, Boxed Greetings.

Peace-and-Love-500

Boxed Greetings is this month’s “TAM” set (Thanks a Million), free with any $60 retail order through 10/31. I stamped the sentiment in white ink then white embossed and die-cut.

The tiny peace sign on the background paper is also part of the Boxed Greetings stamp set.

Peace-and-Love-CU

With the stamp set, I used the coordinating Boxed Greetings Icons die and Cool Dudes stamp set (and die). 🙂

Thanks for visiting today!

1amichele siggy

Stamps: Paper Smooches Boxed Greetings and Cool Dudes Dies: Paper Smooches Boxed Greetings Icons and Snow Dudes Icons Ink: Taylored Expressions Sugar Cube, Oreo, Sprinkles  Paper: Taylored Expressions Sugar Cube, X-Press It Blending Card, Fancy Pants Wish Season Other: Copic markers, sequins, white embossing powder, foam tape.

Queen & Company’s new Halloween Hooplah Shaker Kit

Hi everyone! I have had a super busy couple of weeks. Thank you for visiting once again.  🙂

Today I have a couple cards I created using Queen & Company’s new Halloween Hooplah shaker kit. This kit is a cauldron of fun, loaded with stamps, dies, toppings, beads, bling and the cutest paper pad! Also available are extra toppings, Halloween Hooplah paper pad, refill foam and acetate shapes and Halloween tape.

Queen & Company Halloween Hooplah Shaker Kit

I first created a cauldron shaker filled with spooky eyes, spiders and teeny tiny purple and black diamond stars.

Queen & Company Halloween Hooplah Shaker Kit (close-up)

I created the steam using a YG03 Wide Copic marker, simply sweeping the marker up from the pot in a slightly swirly motion, just like steam. The 3/4″ wide nib made it sooo easy! Before adhering the pre-cut acetate, I also adhered into the pot a few Iridescent Bubbles in green, orange and purple. Those are included in the kit but you can buy more (and in additional colors) HERE.

Queen & Company Halloween Hooplah Shaker Kit

Next I created a fun witch card. Inside the shaker I placed purple beads and tiny black and clear diamond stars. Beneath the hat, I added eyes by punching two small white circles and adhering an iridescent green bubble onto each.

Queen & Company Halloween Hooplah Kit (close-up)

I die-cut and adhered additional hat outlines from card stock and white embossed the fun sentiment. Sprinkled around are a few tiny candy corn toppings. (They work great as embellishments too!)

There’s so much fun to be had in the Halloween Hooplah kit. I love it.  🙂

Thanks for visiting!

1amichele siggy

Stamping Bella Preview – Fa La La

Hi everyone! Today I have my last sample to share from Stamping Bella‘s upcoming October 10 release. All stamps and dies will be available for purchase tomorrow!

Stamping Bella Fa La La, Holiday Sentiments

Today I’ve used new Fa La La with a Holiday Sentiment.

Stamping Bella Fa La La, Holiday Sentiments (close-up)

Copic markers – BG0000, C00, C1, C2, C3, C6, E30, E31, E33, R000, R24, R29, R89, Y21, Y38, YG07, YG09, YR23

Once colored with Copic markers, I “hung” two jingle bells from the tiny racoon’s arm. (He’s so cute!) I also added sparkle to the snowflakes by coloring over each with a Clear atyouSpica glitter pen.

Be sure to check out the Stamping Bella blog today so see more samples and additional previews. While there, leave a comment for your chance to win a $25 voucher to the Stamping Bella Shop!

I’d love to know which of the new sets is your favorite.  If I *had* to choose, it would be a set with Santa and the tiny deer. I love them.  🙂

Thanks for visiting today!

1amichele siggy

Stamps: Stamping Bella Fa La La, Holiday Sentiments  Ink: Taylored Expressions Oreo  Paper: Taylored Expressions Sugar Cube; X-Press It Blending Card, Doodlebug Designs Here Comes Santa Claus (6×6)  Dies: Taylored Expressions Frame in Frame 2 Cutting Plate, Little Bits Snowflake Confetti  Other: Copic markers, Clear atyouSpica glitter pen, Darice 6mm silver jingle bells, thread, rhinestones.

Stamping Bella Preview – Elf with a Reindeer on Top

Hi everyone! I’m back today with another sample from Stamping Bella‘s October 10 release. (Only one today.)  🙂

Stamping Bella Elf with a Reindeer on Top

I used The Littles Elf with a Reindeer on Top along with a Holiday Sentiment. I simply adore those tiny deer. Cutest ever.  🙂

Stamping Bella Elf with a Reindeer on Top (close-up)

Copic markers – C00, C1, C2, E00, E01, E11, E30, E31, E33, E37, E51, G05, G09, R24, R29, R59

After coloring with markers, I added two flags and stitched a wooden heart button over top.  I also added a bit of sparkle to the ribbon on the package using a Clear atyouSpica glitter pen.

Be sure to check out the Stamping Bella blog today so see more samples and additional previews. While there, leave a comment for your chance to win a $25 voucher to the Stamping Bella Shop!

Thanks for visiting today!

1amichele siggy

Stamps: Stamping Bella The Littles Elf with a Reindeer on Top, Holiday Sentiments  Ink: Taylored Expressions Oreo  Paper: Taylored Expressions Sugar Cube; X-Press It Blending Card, Doodlebug Designs Here Comes Santa Claus (6×6)  Dies: MFT Fishtail Flag Layers  Other: Copic markers, wood button, Clear atyouSpica glitter pen.

Stamping Bella Previews – The Littles

Hi everyone! I have five samples to share today using some of Stamping Bella‘s upcoming release. I know it’s a lot but I couldn’t stop. 🙂  All stamps and dies will be available for purchase on Tuesday, October 10. (There is a LOT of cuteness so consider that a warning…)

First, I used Little Bits Santa & His Reindeer with Winter Tree & Deerball.  (I’ll save the deerball for another post. It’s really cute and funny.)

Stamping Bella Santa & His Reindeer, Winter Tree & Deerball, Skating Quartet

I also used a sentiment from new Holiday Sentiments. The North Pole sign is one of the stamps from Skating Quartet.

Continue reading

Stamping Bella Previews – Frosty Celebrations

Hi everyone! I’m back today to share two more samples from Stamping Bella‘s amazing upcoming release! All new stamps and dies will be available for purchase on Tuesday, October 10th. 🙂

Stamping Bella Tiny Townie Frida Loves Frosty

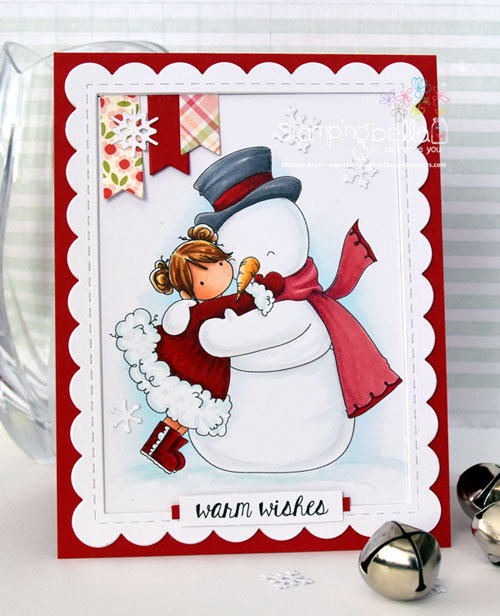
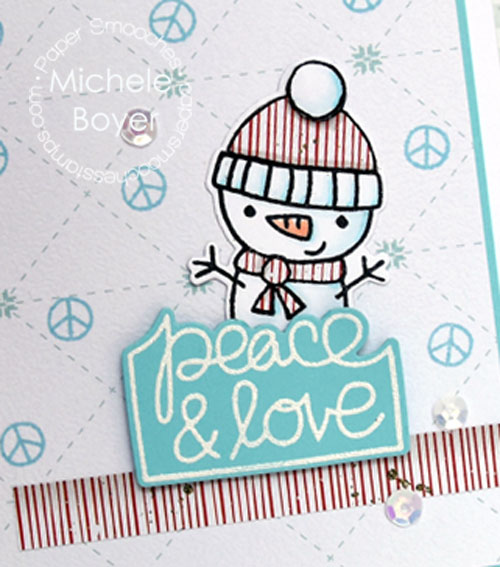
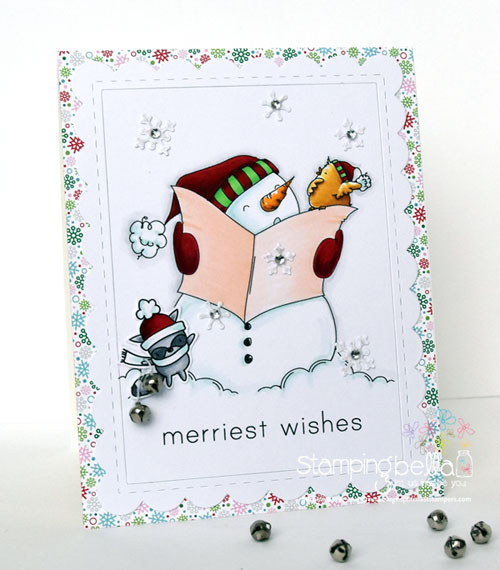
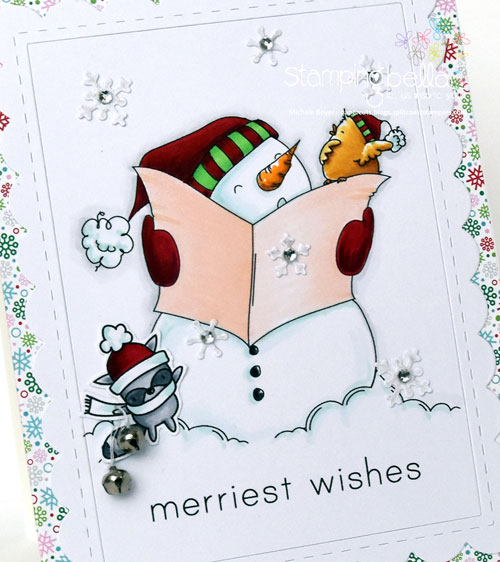
My first sample uses Tiny Townie Frida Loves Frosty. Sooo cute! I love her coat. ♥ ♥ ♥

Stamping Bella Tiny Townie Frida Loves Frosty (close-up)

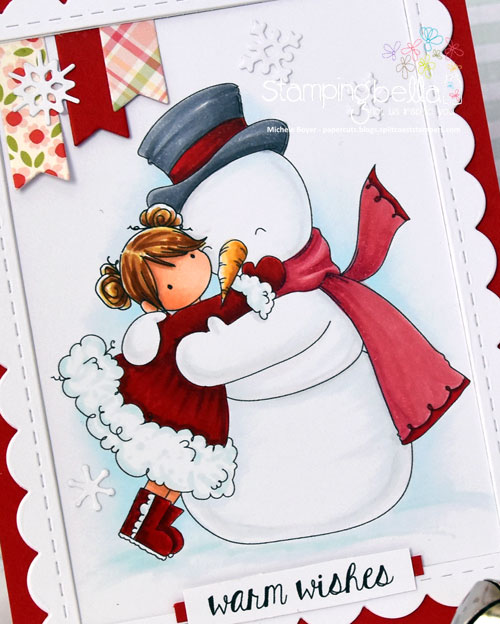
Copic markers – B0000, B000, BG10, C00, C1, C4, C5, C6, E00, E01, E11, E13, E31, E35, 37, R01, R24, R29, R59, R83, R85, RV32, Y21, Y23, YR21, YR23

I colored with Copic markers then added some little flags and snowflakes. The sentiment is from new Holidays Sentiments.

Supplies: Stamping Bella Tiny Townie Frida Loves Frosty, Holiday Sentiments Dies: Taylored Expressions Frame in Frame 2, Little Bits Snowflake Confetti; MFT Fishtail Flags  Ink: Taylored Expressions Oreo  Paper: Taylored Expressions Cherry Pop; X-Press It Blending Card; Carta Bella It’s a Girl  Other: Copic markers.

Stamping Bella Celebrating Squidgy

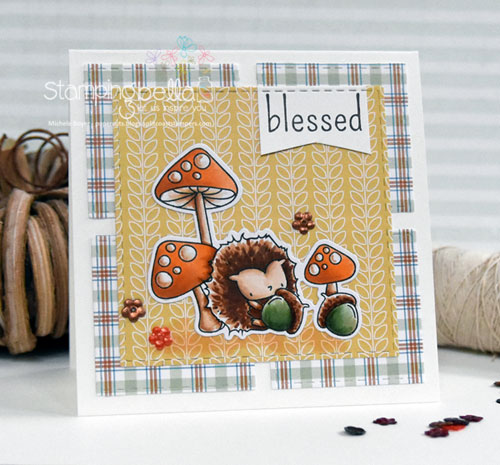
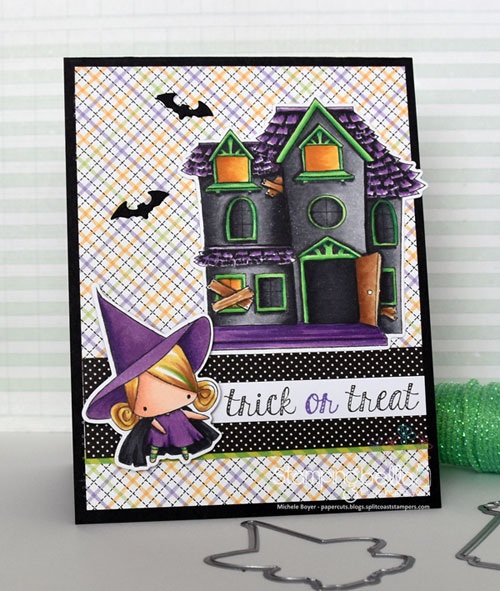
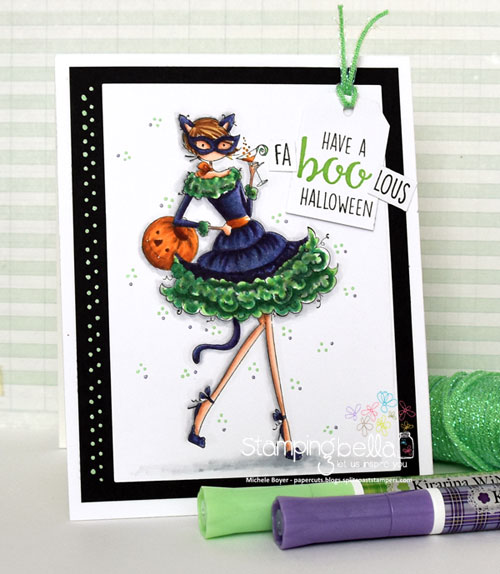
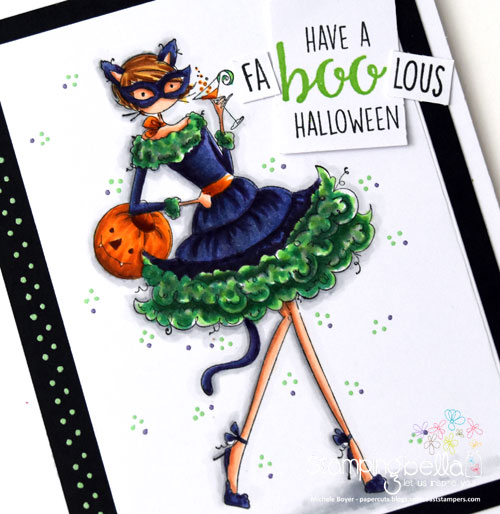
Next, I used new Celebrating Squidgy with Holiday Sentiments.

Stamping Bella Celebrating Squidgy (close-up)

Copic markers – B23, B24, C00, C1, C2, E00, E01, E11, E33, E35, G21, G24, R83, R85, V15, V17, Y21, Y38, Clear atyou Spica glitter pen

After coloring with Copic markers, I added lots of subtle sparkle to her dress, crown, the stars on her glasses, the bottle label and fizz using a Clear atyouSpica glitter pen. (I couldn’t get the sparkle to show in the photo.)

Supplies: Stamping Bella Celebrating Squidgy  Ink: Taylored Expressions Oreo Paper: Taylored Expressions Sugar Cube, Rainbow Brights, Gold Foil; X-Press It Blending Card  Other: Copic markers, Clear atyou Spica glitter pen, Taylored Expressions Jelly Donut enamel shapes.

Be sure to check out the Stamping Bella blog today so see more samples and additional previews. While there, leave a comment for your chance to win a $25 voucher to the Stamping Bella Shop!

Thanks for visiting!

1amichele siggy

Have a faBOOlous Halloween

Hi everyone! It’s another Bellarific Friday with Stamping Bella! This week the team is sharing samples using October’s Stamp of the Month, Uptown Girl Kitty Loves Halloween. She, along with the coordinating sentiment, is 20% off through October 31st.

Stamping Bella Uptown Girl Kitty Loves Halloween

I colored the image with Copic markers, as usual then added a simple dotted border using a Lime Green Kirarina Wink pen. (I also used a ruler because my “straight lines” aren’t always so straight.)

kirarina2

The metallic ink in Kirarina Wink pens allows you to add color to a variety of surfaces including paper, photos, plastic and glass.  When working on a porous surface, such as paper, the pen should be moved slowly in order for the ink to absorb. I previously used Kirarina Wink on black card stock. The color is so vibrant!

Stamping Bella Uptown Girl Kitty Loves Halloween (close-up)

Copic markers – BG10, BV04, BV08, C00, C2, C3, C4, G19, E00, E01, E11, E31, E33, E35, Y21, YG06, YG09, YR04, YR18

Once I had assembled my card, I decided to also add a bit of patterned background using Lime Green and Purple Kirarina Wink pens.  So you can see the color looks great on both light and dark card stock (but especially awesome on dark)!  I plan to make my own black envelope and use the pens to address, with a bit of doodling too!

To finish my card, I created a tag, adding the “fa” and “lous” to each side of the “boo” sentiment. Lastly, I tied in a bit of Queen & Company‘s bright Green Sparkle String.

Next week’s challenge is to use this {Mojo}Bella sketch:

Oct 13

Use any current Stamping Bella image then email your card to [email protected] by next Thursday to be featured on the SB blog and to be entered to win some Bella Bucks! (All challenge details can be found HERE.)

Thanks so much for stopping by!

1amichele siggy

Stamps: Stamping Bella Uptown Girl Kitty Loves Halloween  Ink: Taylored Expressions Oreo, MFT Green Room  Paper:  X-Press It Blending Card, Taylored Expressions Sugar Cube and Oreo  Other: Copic markersKirarina Wink Lime Green and Purple, Queen & Company Green Sparkle String