Monthly Archives: January 2018

Celebrate (with teeny stars)

Hi everyone!  Today I have a card to share using Paper Smooches‘ new Teeny Stars dies. It was super-quick and easy, and works for male or female. (Masculine cards are so hard for me.)

Paper Smooches Celebrate Word Die and Teeny Stars Dies

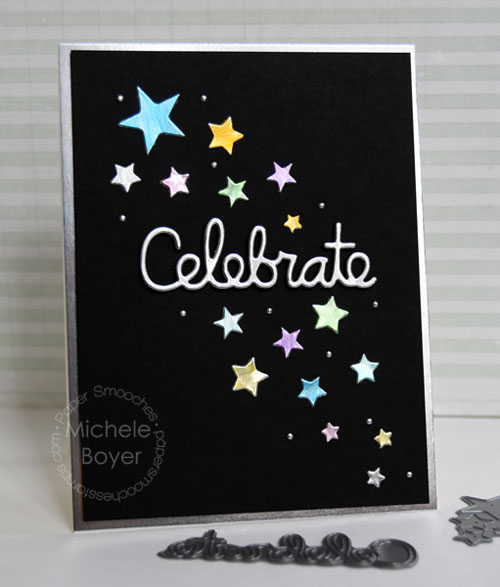
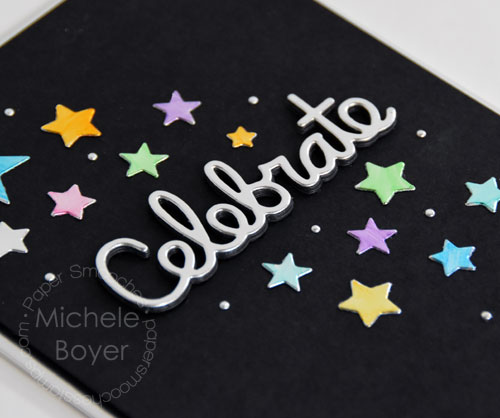
I first die-cut the word Celebrate several times from black card stock then once from silver foil card stock. I layered all then adhered to the center of the black panel.

Paper Smooches Celebrate Word Die and Teeny Stars Dies

Copic markers – B16, BG15, G05, RV14, V17, Y17, YR04

I die-cut the stars from silver foil as well then colored most with Copic markers. When I looked closely at the foil paper, I could see very slight directional lines (grain) so I colored in the direction of the lines and that way, the added color was pretty smooth.  To create the tiny dots, I die-cut a scrap of silver foil using the Stitched Square die. The dots are the perfect little accents, I think! Once the panel was assembled, I adhered it to a silver foil panel and then to a card base.

Thank you so much for visiting today! I’ll be back tomorrow with something new and super fun from Queen & Company.  🙂

1amichele siggy

Friends are Flowers (stamping bella)

Hello everyone.  🙂  I often get caught up in using the  most recent releases, tending to forget about my older “inventory.”  But this week Stamping Bella‘s challenge was to go “vintage.”  Not to create a vintage style but to use an older image or stamp set. YAY!  The perfect push to revisit old favorites.  I have always loved the Lulu stamps so that’s the first line that entered my mind.  🙂

Stamping Bella Lulu's Garden of Daisies

I have several Lulu stamps so it was actually a bit of a tough decision, which to use. I decided on Lulu’s Garden of Daisies.

Stamping Bella Lulu's Garden of Daisies (close-up)

Copic markers – E00, E01, E11, E35, E37, V01, V12, V15, V17, W00, W1, W2, W3, W5, Y21, YG93, YG95, YG97, YG99, YR18, YR23

After coloring with Copic markers, I added a subtle shimmer to Lulu’s dress using a clear Wink of Stella glitter brush. The sentiment, from Garden Girl Flower Sentiments was stamped using black and purple ink, then die-cut with a die from a lovely set, gifted to me by my very sweet and generous friend, Bev. ♥

Next week’s challenge

Use a stamp from the same category as this month’s Stamp of the Month which is Winter Backdrop (20% off through 1/31 by the way). So next week we’ll use any other backdrop stamp. If you’d like, email your card to [email protected] by next Thursday to be featured on the SB blog. By doing so, you’ll also be entered to win some Bella Bucks! (All challenge details can be found HERE.)

Thanks so much for visiting today! 🙂

1amichele siggy

love you (stamping bella)

Hi everyone.  Today I did a bit of coloring using an image from Stamping Bella‘s latest release.

Stamping Bella Tiny Townie Raven Loves Ribbon

I just *love* the heart shaped ribbon being held by Tiny Townie Raven Loves Ribbon.  So cute.

Stamping Bella Tiny Townie Raven Loves Ribbon (close-up)

Copic markers – BG0000, BG10, BG70, E00, E01, E11, E31, E33, E35, E37, E40, E41, R05, R14, R24, R29, R32, RV42, Y21, YR21, W00, W1, W2

I colored with Copic markers on X-Press It Blending Card then added a bit of stitching as well as a few die-cut Tiny Hearts (also colored with a Copic). As an afterthought, I added a bit of pattern to the dress using a 0.3 Wine Copic Multiliner.

I’ll be back soon with Stamping Bella’s challenge for this week. 🙂  Thanks for visiting.

1amichele siggy


thanks sew much (paper smooches)

Hello, and thanks for visiting today! I hope you’re smoothly getting back into the swing of things after the holiday. Sometimes it’s a slow-going process. We’ve had a couple snow days and now a three-hour early release due to possible freezing rain/ice so my return to normalcy has not yet occurred.  (Turtle speed.)

Today I’m sharing a card I created using stamps and dies from Paper Smooches‘ latest release.

Thanks-So-Much-Embr-Hoop-500

I’ve used the new Embroidery Hoop dies (which includes the hoop as well as the stitched mug and several stitches) with a sentiment from new In Stitches stamp set and Stitched Circle die.

Thanks-So-Much-Embr-Hoop-CU

I stamped the needle from In Stitches then scribbled in a bit of thread.  In Stitches stamp set is free through January 31 with any $60 retail order. Pretty awesome!

The new stitch dies and stitch stamp set are all so popular they are currently sold out but expect to be back in stock soon.  🙂

Thanks so much for visiting!

1amichele siggy

Stamping Bella’s January Stamp of the Month

Hi everyone! Welcome to the first Bellarific Friday of 2018! This week the team is working with Winter Backdrop, Stamping Bella‘s January Stamp of the Month, available at 20% off through January 31.

Stamping Bella Winter Backdrop and Snowman Love

I paired the background with Snowman Love from The Littles Collection and a Holiday Sentiment. The stamp is large enough to fit an A2 card horizontally but I chose to use it vertically.

Stamping Bella Winter Backdrop and Snowman Love (close-up)

Copic markers – BG0000, BG000, BG10, BG11, BG13, BG15, BG18, C1, C2, C4, C5, C7, E00, E01, E11, E31, E33, E35, E37, G05, G28, R59, R83, R85, RV11, RV32, Y17. Y21, YG05, YG07, YG09, YG17, YR12, YR23; Copic Opaque White

After coloring with markers, I added tiny dots of Opaque White using a toothpick.

Next week’s challenge is to use a current Stamping Bella image that was not part of the latest release (in other words, an older but currently available stamp). If you’d like, email your card to [email protected] by next Thursday to be featured on the SB blog. By doing so, you’ll also be entered to win some Bella Bucks! (All challenge details can be found HERE.)

Thanks so much for stopping by! Have a great weekend!

1amichele siggy

Love You (stamping bella)

Hi everyone! I’ve been playing a bit with Stamping Bella‘s new Uptown Zodiac Girls. Today I colored the twins, Gemini, as BFFs.

Stamping Bella Uptown Zodiac Girls - Gemini

I think this image is so sweet. (And I wish I had that hair.)

Stamping Bella Uptown Zodiac Girls - Gemini (close-up)

Copic markers – BG10, BG70, E000, E00, E01, E09, E11, E31, E35, E37, E49, G19, G28, R01, R02, R39, R81, R83, R85, RV11, RV32, V09, V12, V15, V17, W00, W1, W2, Y21, YG06, YG07, YG09, YG17, YR14, YR18, YR23

I used the “love you” sentiment from Edna Blows a Kiss Sign, splitting with words to place each within a heart.

The super sparkly Posies embellishments are from Queen & Company.

Thanks so much for visiting today!  🙂

1amichele siggy

Thanks a Bunch (Queen & Company)

Hi everyone! Happy New Year!  I hope your evening was fun and safe. I was safely wrapped in a blanket on the couch watching tv.  🙂

Today I’m sharing two cards using my favorite Queen & Company kit, Heart Throb.  I love the color scheme and small patterns in the paper pad as well as the tiny heart toppings.

Thanks-a-Bunch-500

My first card uses the Lines Foam Front Shaker Kit in addition to the Heart Throb kit. As I’ve mentioned before, the foam kits are so easy and quick!

Before adhering Lines foam shape, I adhered to the card front a panel of dotted paper so the dots show through the shaker windows. I filled the openings with the tiny hearts included in the kit as well as Diamonds and Posies.  The acetate was added then topped with a panel of heart paper die-cut using the Lines Foam Front Die.

Thanks-a-Bunch-CU-500

I die-cut the heart and thanks sentiment (both included in the kit) then layered over the shaker windows.

The kit also includes a sentiment sticker sheet. I adhered the “a bunch” sticker over card stock then trimmed and adhered over the heart and foam front. By adhering the sticker to card stock, the sticker has a stronger base, providing a smooth surface over the uneven layers below.

I-Just-Love-You-500-R3

Next, I created a quick and easy “love” card using the heart and love dies from the Heart Throb kit as well as a partial sentiment from the stamp set included in the Fruit Basket kit.

I-Just-Love-You-500-CU-R3

I die-cut “love” three times from white card stock then once from patterned paper, layered and adhered to the white heart. I then used my MISTI to position the partial sentiment above and below the die-cut. The two hearts were adhered to the plaid patterned paper then stitched to the card front.

As a finishing touch, I adhered three glittery white Posies. I love the posies as they easily add a little sparkly detail to any design.

Thanks so much for stopping by today!

1amichele siggy