Monthly Archives: July 2018

Chillin’ (with Paper Smooches)

Hi everyone!  Today I have a few cards to share using Paper Smooches stamps and dies.  🙂

Paper Smooches Cool Treats

First I used Cool Treats dies with a sentiment from Chilly Chums.

Paper Smooches Cool Treats (close-up)

To create the popsicles, I first watercolored onto watercolor cardstock. Once dried, I die-cut, adhered over the die-cut popsicle sticks using foam tape, and added cute little enamel heart shapes.

Paper Smooches Courteous Cuties

Next I used a heart die as a guide for placement of tiny stamped hearts from Courteous Cuties.

Paper Smooches Courteous Cuties (close-up)

Copic markers – BG10, BG11, Y06, Y08, YR23

The tiny bee was stamped onto X-Press It Blending Card, colored with Copic markers and die-cut using it’s coordinating Courteous Cuties Icons die.

Paper Smooches Southwest Charm

Lastly, I used the kokopelli stamp from Southwest Charm to create a southwest greeting.

Paper Smooches Southwest Charm (close-up)

I used my MISTI to help align the kokopelli.

Thanks so much for stopping by today!

1amichele siggy

Happiness Blooms from Within (stamping bella)

Hi everyone! It’s another Bellarific Friday with Stamping Bella! This week we’re featuring images from the lastest release.  I chose from the new Oddball category.  🙂

Stamping Bella Long Stemmed Oddball

I stamped Long Stemmed Oddball onto X-Press It Blending Card then colored with Copic markers.

Stamping Bella Long Stemmed Oddball (close-up)

Copic markers – BG11, E00, E01, E11, E35, E35, E37, W00, W1, W2, Y21, YG03, YG06, YG09, YG17, YR23

The sun was stamped from Littles Ice Cream & Lemonade.

Amazing-Amanda-500

Also this week, I created a card using Tiny Townie Amanda is Awesome. Unfortunately, I can’t find the list of markers I used. Should it surface, I will add in the info.

NEXT WEEK’S CHALLENGE

Use any current Stamping Bella image. (No restrictions.) If you’d like, email your card to [email protected] by next Thursday to be featured on the SB blog. By doing so, you’ll also be entered to win some Bella Bucks! All challenge details can be found HERE.

Thanks so much for visiting today!

1amichele siggy

Smile. Enjoy. Celebrate. (stamping bella)

Hi everyone! Another week has come and gone in the blink of an eye. What a crazy summer.

This week the Stamping Bella team is designing with images from the same category as our Stamp of the Month, The Littles Sandcastle Set (which is 20% off through July 31).  I chose to use The Littles Ice Cream and Lemonade. You can find all Littles HERE.

Stamping Bella The Littles Ice Cream and Lemonade

I first stamped the ice cream then masked the image and stamped the girl.

Stamping Bella The Littles Ice Cream and Lemonade (close-up)

Copic markers – BG10, BG11, BG13, BG18, E00, E01, E11, E31, E35, E37, E41, E42, E43, R59, R83, R85, RV11, RV32, W00, W1, W2, Y21

I colored with Copic markers then stamped a Birthday Sentiment.  Cute background paper is from Queen & Company‘s Fruit Basket paper pad.

Earlier this week, I posted the card below using new Daphne and her Dogs on Instagram. Markers used are noted below photo. Cute paw print die is from Paper Smooches.

Dogs-are-Favorite-500

NEXT WEEK’S CHALLENGE

Use an image from the latest release.  If you’d like, email your card to [email protected] by next Thursday to be featured on the SB blog. By doing so, you’ll also be entered to win some Bella Bucks! All challenge details can be found HERE.

Thanks so much for visiting today!

1amichele siggy

Apples and Lemons (more pom fun – queen & company)

Hi everyone! I’ve been playing again with Queen & Company’s fun pompoms from the Birthday Bash kit. (It’s hard to stop!)

Thanks-for-Everything-500

First, I created a thank you, perfect for a teacher, tutor or anyone, really.

I used a tree die to create the tree base, then adhered to light blue Simple Stripes patterned paper. Then, using Sheer Glue, I randomly adhered small and large green pompoms.

Thanks-for-Everything-500-CU

Between the green pompoms, I tucked several red Rubber Bubbles to resemble apples. I added a single red Rubber Bubble at the tree base, drew a tiny stem and added a small die-cut leaf.

Supplies: Pompoms from Birthday Bash kit, Simple Stripes patterned paper, Red Rubber Bubbles, Sheer Glue

Pucker-Up-500

Next I created a super simple card with pompom “lemons.”  I pinched the ends of six yellow pompoms then adhered each with a small Gloober.


Pucker-Up-500-CU

I drew in tiny stems then added die-cut leaves. Once the sentiment (from Paper Smooches) was stamped, I adhered the panel to a block of green Delight Dots patterned paper. The assembled panel was then adhered to a white card base.

Supplies: Pompoms from Birthday Bash kit, Delightful Dots patterned paper, Red Rubber Bubbles, Gloobers

Q&C pompoms are available as part of the Birthday Bash kit as well as a kit refill and cute individual drawstring bags.

Thanks so much for visiting today!

1amichele siggy

Smile (stamping bella)

Hi everyone.  Welcome to another Bellarific Friday with Stamping Bella! This week we are creating with older images, not from the latest release. I chose to use Tiny Townie Butterfly Girl Bess.

Stamping Bella Tiny Townie Bess the Butterfly

I stamped onto bright white X-Press It Blending Card and colored with Copic markers.

Stamping Bella Tiny Townie Bess the Butterfly (close-up)

Copic markers – E00, E01, E11, E31, E35, E37, E50, E51, R000, R00, R01, R83, R85, RV11, RV32, W00, W1, W2, Y21, YR23

I did sneak in a sentiment using the smallest of the new Smile sentiment dies.  (There are three different sizes in each set. You can find all here.)

Also this week, I posted the below card on Instagram.  (New Dawn Loves her Doggie.)

Stamping Bella Dawn Loves her Doggie

Copic markers – B95, B97, E00, E01, E11, E13, E29, E30, E31, E34, E35, E37, E41, E42, E43, E47, E50, E51, R29, R89, W00, W1, W2, Y21

NEXT WEEK’S CHALLENGE

Use an image from the same category as the July Stamp of the Month (The Littles Sandcastle Set), which means use an image from the The Littles category.  If you’d like, email your card to [email protected] by next Thursday to be featured on the SB blog. By doing so, you’ll also be entered to win some Bella Bucks! All challenge details can be found HERE.

Thanks so much for visiting today!

1amichele siggy

Yo ho, Yo ho (paper smooches)

Hi everyone. I’m still trying to get back into the swing of things here. It’s been crazy.

Today I’ve used Ahoy Me Hearty from Paper Smooches.  🙂

Paper Smooches Ahoy Me Hearty

Once colored with Copic markers, my parrot was die-cut using its coordinating Ahoy Icons Die then perched atop a Seasonal Tree (minus one branch).

Paper Smooches Ahoy Me Hearty (close-up)

Copic markers – E30, E31, E33, E35, E37, G17, G28, R29, R89, Y17, YG06, YG09, YR16, YR23, YR27, 110; Brown Copic Multiliner

After stamping the gold coins, I “hung” each one from the branch using a brown Copic Multiliner.

Thanks so much for visiting today. I’ll be back soon.  🙂

1amichele siggy

Life’s a Beach (stamping bella)

Hello everyone. Today the Stamping Bella team is creating with the July Stamp of the Month, The Littles Sandcastle Set. It’s soooo cute.  And 20% off through July 31.  🙂

Stamping Bella Littles Sandcastle Set

I created a little scene by first sponging some clouds then added a bit of (kraft) sand.

Stamping Bella Littles Sandcastle Set (close-up)

Copic markers – BG07, BG18, E00, E01, E11, E31, E35, E37, E41, E42, E43, E44, N7, N9, R01, R02, R29, R89, Y21, YR16, YR23, YR27, Kirarina Wink White Pearl pen

After stamping the Summer Sentiment, I adhered the window panel on foam tape then adhered the Copic colored elements.  Once complete, the scene was adhered over a block of red Delightful Dots patterned paper from Queen & Company.

Also this week, I posted the below card on Instagram.  (New Fishing Squidgy.)

Stamping Bella Fishing Squidgy

Copic markers – B91, B93, B95, B97, B99, BG10, BG23, E30, E31, E33, E34, E35, E37, E49, E50, E51, E53, G21, R01, R08, R37, R89, W00, W1, W2, Y21, YG63, YG67, YG97, YR0000, YR000, YR14, YR18, YR23

NEXT WEEK’S CHALLENGE

Use a vintage Stamping Bella image, meaning one NOT from the current/most recent release. (If the image is not listed in the “what’s new” category, then it’s considered “vintage.”) If you’d like, email your card to [email protected] by next Thursday to be featured on the SB blog. By doing so, you’ll also be entered to win some Bella Bucks! All challenge details can be found HERE.

Thanks so much for visiting today!

1amichele siggy

Fun with PomPoms (queen & company)

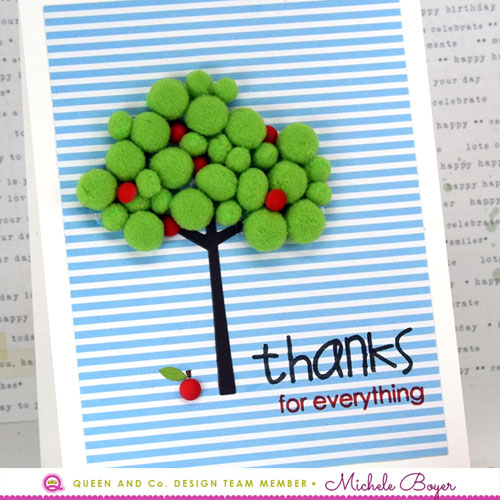
Hello there! I have been having loads of fun playing with Queen & Company’s pompoms.  The poms are available in the super cool Birthday Bash kit as well as individual colors/sets (in cute bags) and as a kit refill. So many great options.  : )

Thank-You-Poms-500

On my first card, I used multiple pompoms to create flowers in the shape of a heart on yellow Delightful Dots patterned paper. I found it helpful to layout the design first then snap a quick photo with my cell phone to use as a reference when adhering the poms.

Thank-You-Poms-500-CU

To create the small green leaves, I trimmed just a tiny bit away from one side of a small green pom then pinched the ends before adhering.

To adhere each pom, I used medium and small Gloobers. Using the Gloobers, assembly was quick and easy with no mess. Once assembled, I added a die-cut sentiment then adhered the panel to my card base.

Supplies:  PomPoms from Birthday Bash kit, Delightful Dots patterned paper, Gloobers, Handlettered Greetings (Simon Says Stamp)

Welcome-Baby-500

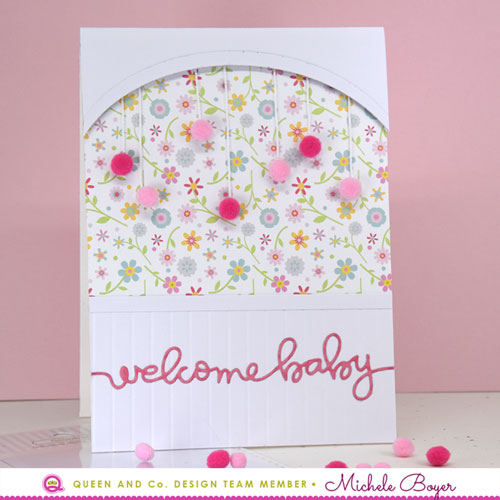
Next, I created a Welcome Baby card, using pompoms as a sort of mobile. I first adhered a block of Flirty Florals pattered paper to a white card base. I then die-cut white card stock using the long side of an oval die. I die-cut a second piece of white card stock, again with the oval die, then slid the die down just a bit and die-cut again to create the arched border. I adhered a strip of foam tape behind the “canopy,” then adhered lengths of white string to the foam tape. I adhered the canopy to the top of the floral paper with the strings loosely hanging down.

Welcome-Baby-500-CU

I determined the length of each string then adhered Gloobers to hold the string ends in place. I trimmed away the excess string then adhered my poms.

To create the white “paneling” below the mobile, I firmly scored white card stock every ¼”, added a thin strip across the top and, lastly, adhered the die-cut sentiment.

Supplies: PomPoms from Birthday Bash kit, Flirty Florals patterned paper, Gloobers, Handlettered Greetings (Simon Says Stamp)

The Birthday Bash kit can be used for so much more than just birthdays! How else can you imagine using the pompoms?

Thank so much for visiting today!

1amichele siggy